This post is for vRealize Automation / vRealize Orchestrator 8 administrators with no or little experience in Codestream. It will show one use case where vRealize Codestream could come in handy to automate things in form of a pipeline using vRealize Orchestrator workflows.
Introduction
In the first part of this two part post we focused on getting a vRealize Orchestrator workflow toolset in place to build a vRealize Codestream pipeline. The goal of the pipeline will be to automate the VM image management for vRealize Automation.
In this part we are going to build the actual pipeline and make it available as Service Broker item in vRealize Automation. So, let‘s get started !
Preparation
1. Setting up Codestream
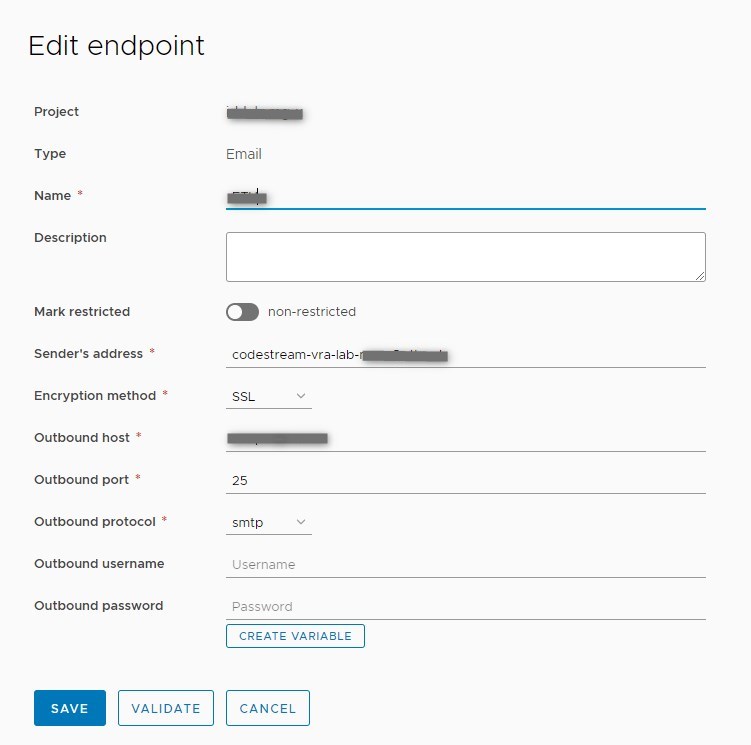
As we are making use of a vRealize Orchestrator endpoint in codestream we have to configure it first. Please configure a variable under “Configure/Variables” for your password and reference to it in the endpoint config. If entered directly in the form, it will show up in the pipeline runs.

To be able to send notifications to the requestor we also setup a mail account:
Building the Codestream pipeline
1. Defining Inputs
After selecting “New Pipeline” starting with a blank canvas, we need the following inputs for our pipeline:
A string input for a build number. This will be written to the notes field of our template (see pt.1 of this post)
- The projectId. This will be the project our passive template gets deployed to. More on how we will get ID will be covered later in this post
- An OS selector value that tells us which OS type template we are going to manage. This is one of the keys in our vRealize Orchestrator configuration element we put in place in pt.1 of this post.
PS: The input variables will become available as inputs in service broker once we will configure this later in this post.

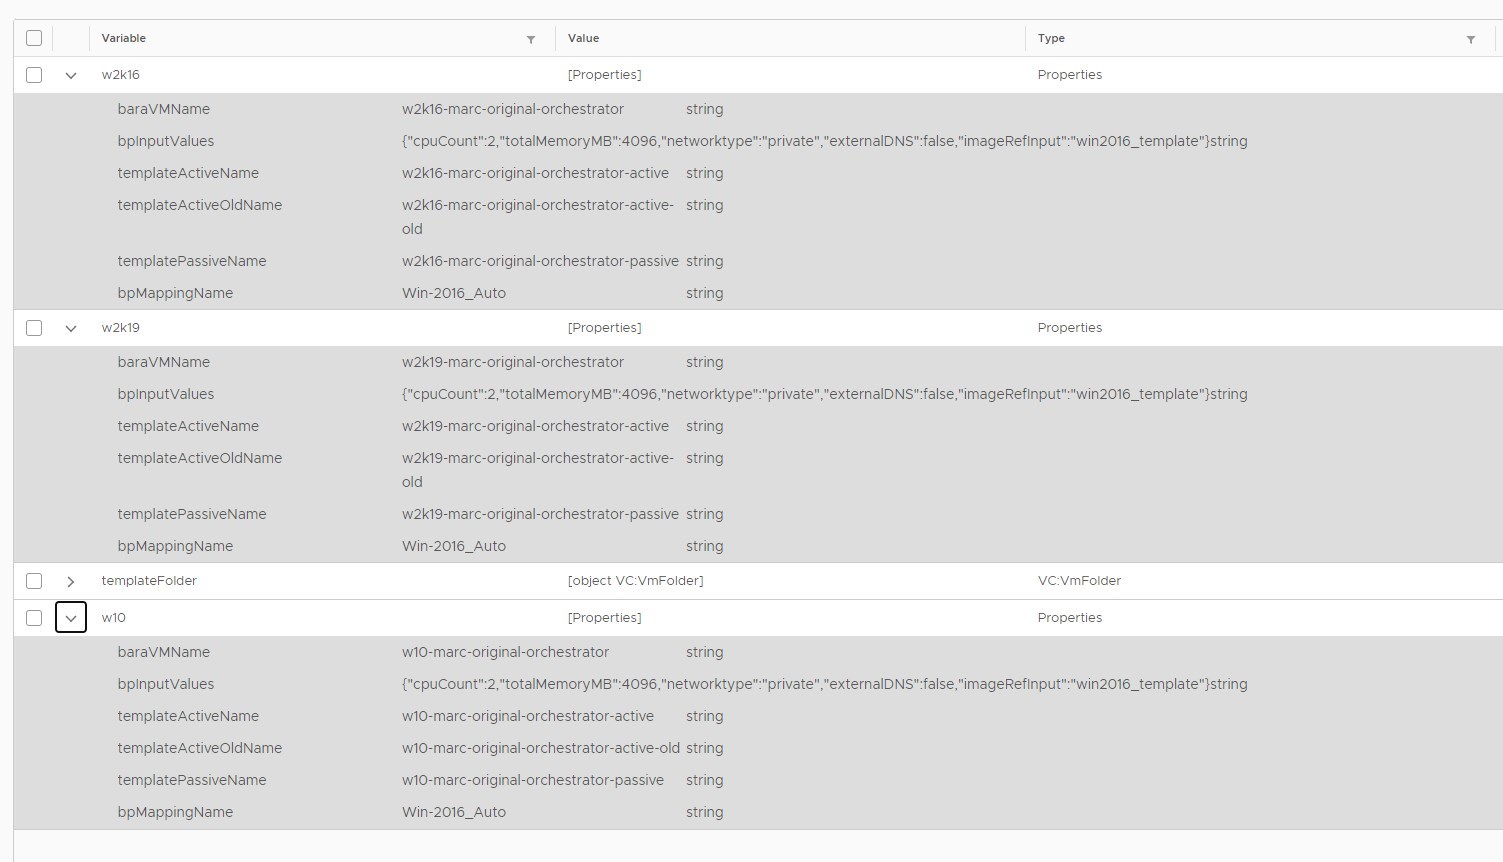
2. Stage 1: Get values from vRealize Orchestrator configuration element
Next up we will get the values needed from our configuration element for the selected OS in the “templateSelector” input. For this we will use the workflow written in pt.1 , step 5 called “Get template mapping”. As a reminder, here is a screenshot of the config element:
Since this is our first workflow we are going to use in our pipeline I’m going to cover all the steps in detail here:
1. Insert workflow element in pipeline
We drag the “vRO” tile from the left to our canvas and label our first pipeline stage “Prepare inputs”. When the type “vRO” is choosen we are able to select our vRO endpoint and the “Get template mapping” workflow.
(Remember: For the workflows to show up here they have to be tagged as “CODESTREAM” in vRO.)
Any Inputs of the selected workflow will automaticly show up:
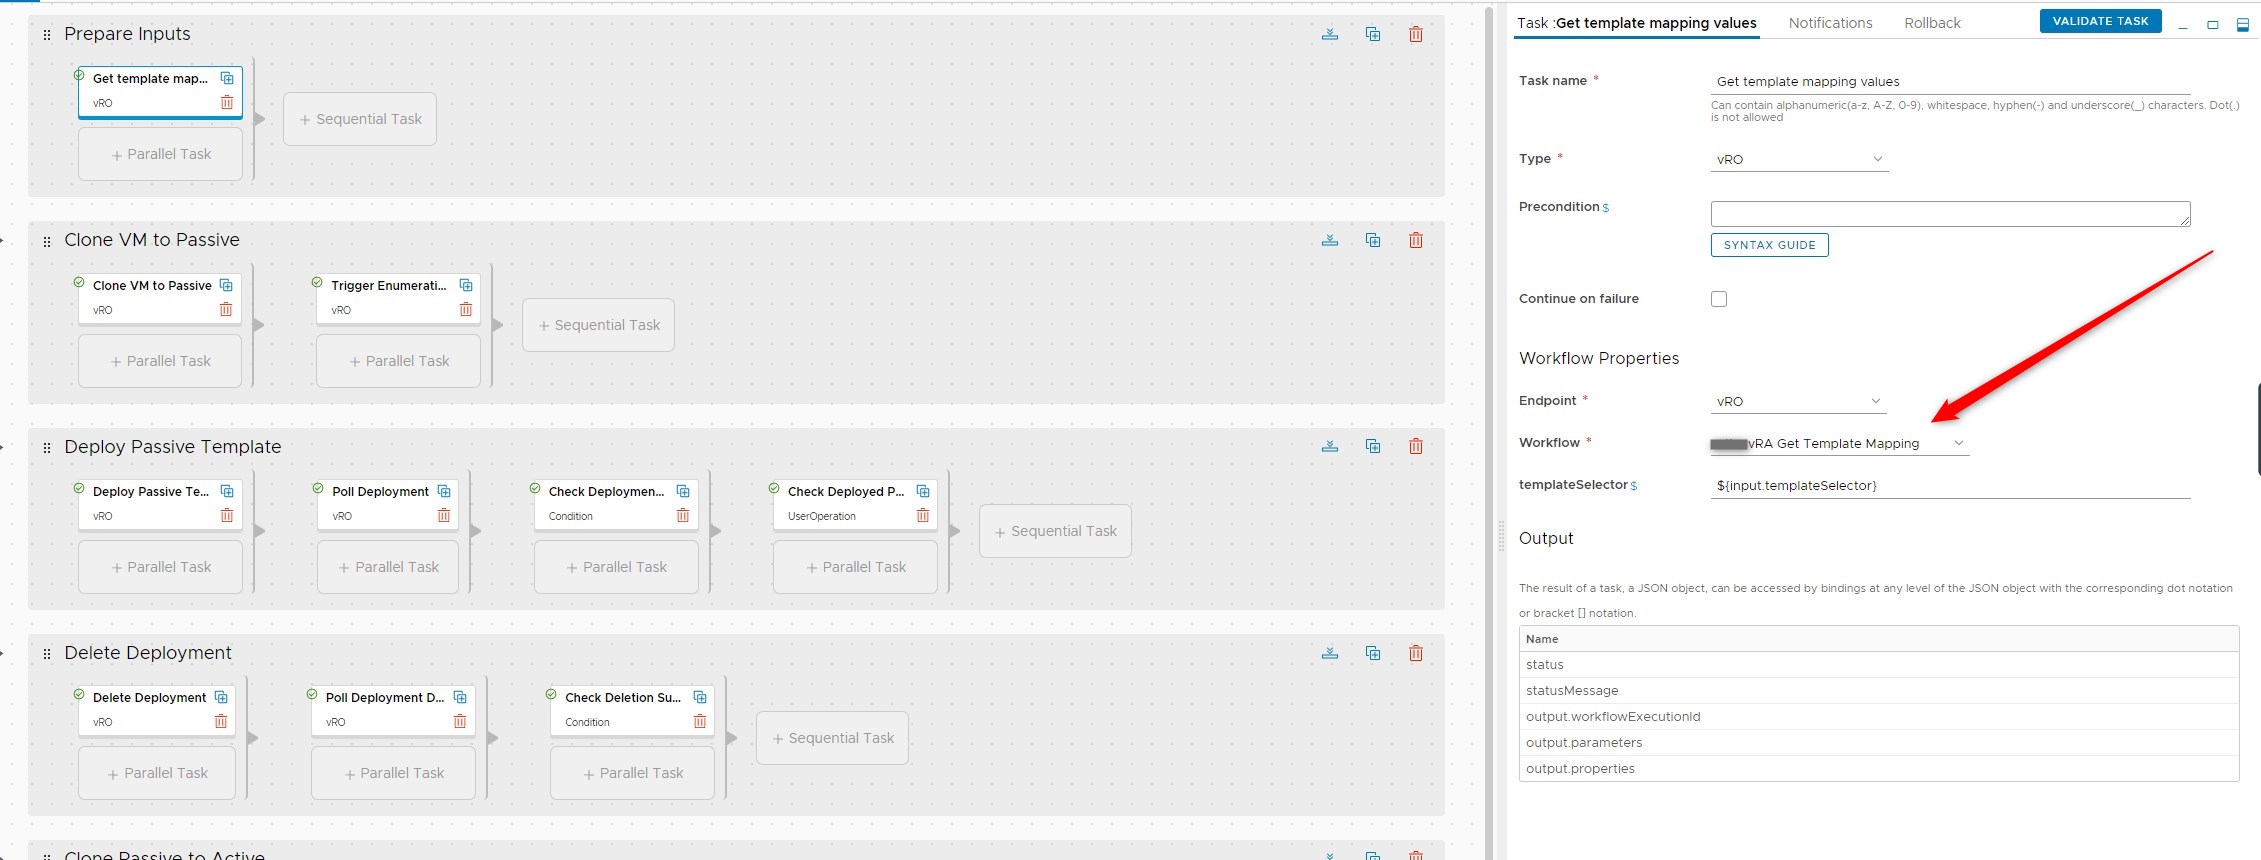
In this picture you can see one of the key things we are going to use for all vRO elements: Binding a pipeline variable. In this case it’s our templateSelector input we want to send to the input of the workflow. We reference it as “${input.templateSelector}”
2. Getting the vRO workflow outputs during pipeline run
Once the pipeline is saved we can run it in the actions menu. This will trigger the vRO workflow. If we close the pipeline editor and select “Executions” we can see the pipeline run taking place:

By clicking on the “Get template mapping values” the output values of the vRO workflow get revealed. If you click on “VIEW OUTPUT JSON” you can see this:
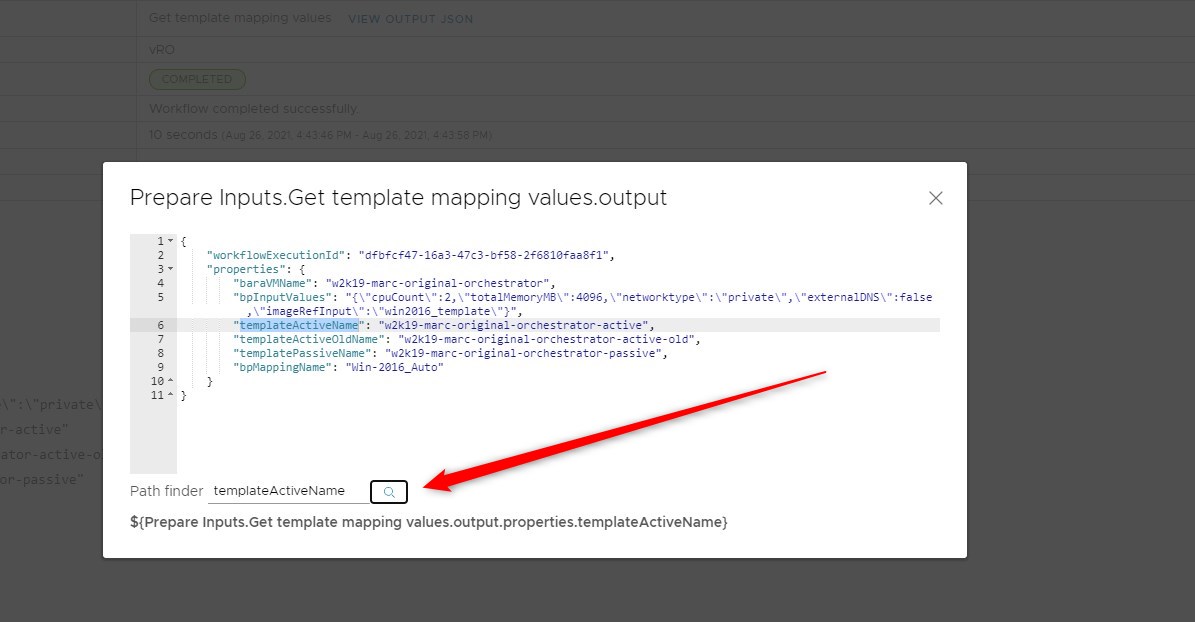
Remember how we used “${input.templateSelector}” for the input binding of this worklow ? In this window you can see how you can reference a vRO workflow output during the pipeline run. Just enter the variable needed in the path finder and the reference will show up. You can use it at any point in the pipeline in almost any field, even for mail notifications.
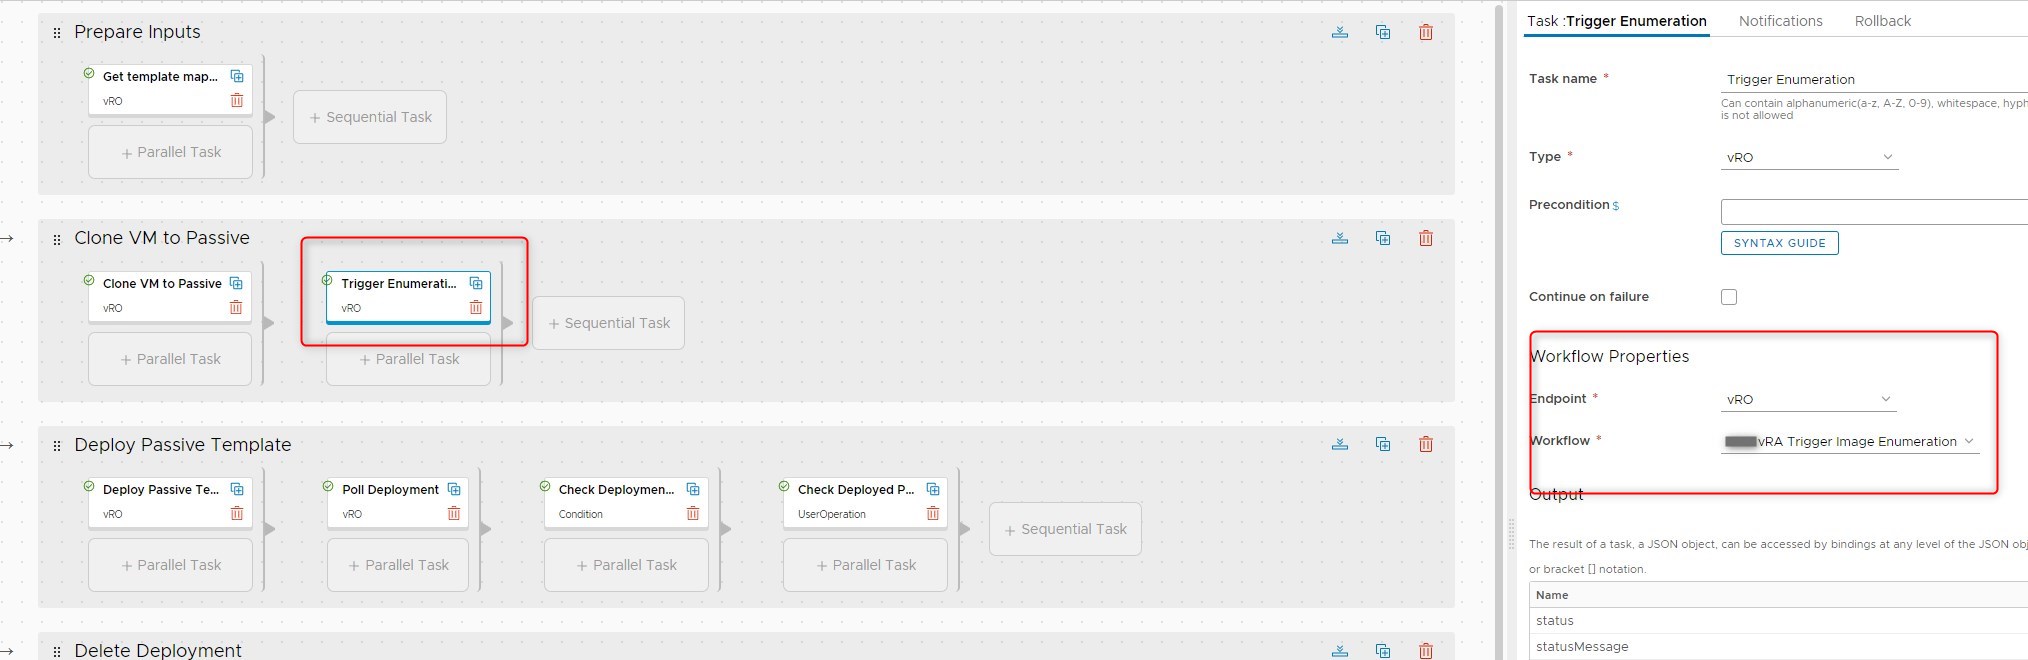
3. Stage 2: Clone VM to passive template
First we are going to create a new stage and give it a useful name like “Clone VM to passive”.
In this stage we are going to clone our VM to the passive template and trigger an image enumeration on vRealize Automation.
Now we are going to call our “Update VM templates” workflow that we built in pt.1 by creating a new task. We are going to pass “1” as input argument to get the workflow to clone our VM to the passive template. We also pass ${input.templateSelector} and ${input.baraBuildVersion} to the workflow inputs as the workflow needs to know which VM should be cloned (according to the coniguration element) and which version number should be written in the VM notes field in vCenter.

After this we are going to insert our “Trigger Image Enumeration” workflow so vRealize Automation will be aware of our new template just created. This workflow needs no inputs as it enumerates all cloud zones by default:
4. Stage 3: Deploy passive template
Now it’s time to deploy the passive template that we have just cloned. This stage consists of two vRealize Orchestrator workflow calls and two Codestream elements.

First we are going to call our “Request Blueprint” workflow. This workflow needs the following inputs:
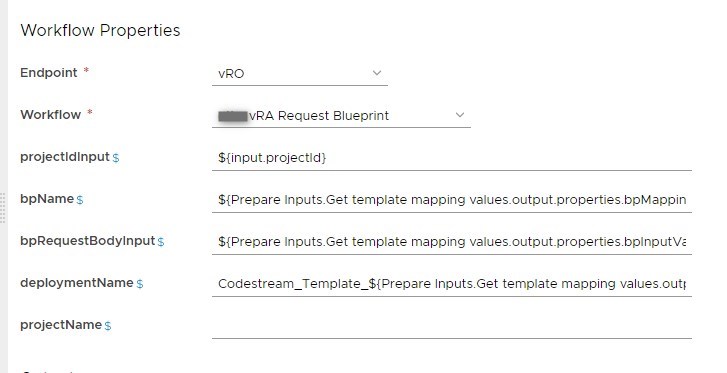
projectIdInput will be bound to the input ${input.projectId} and will be filled with the correct projectId once we configure the Service Broker item later in this post.
bpName and bpRequestBodyInput are values we fetched in the first stage of this pipeline from the configuration element. We will bind those to the correct value (As described in 2.)
For the deploymentName I did choose a prefix together with the name of the passive template from the configuration element.
The projectName input of the workflow is not needed as we already feed it with the projectId.
Let’s look at the output of the finished workflow task:
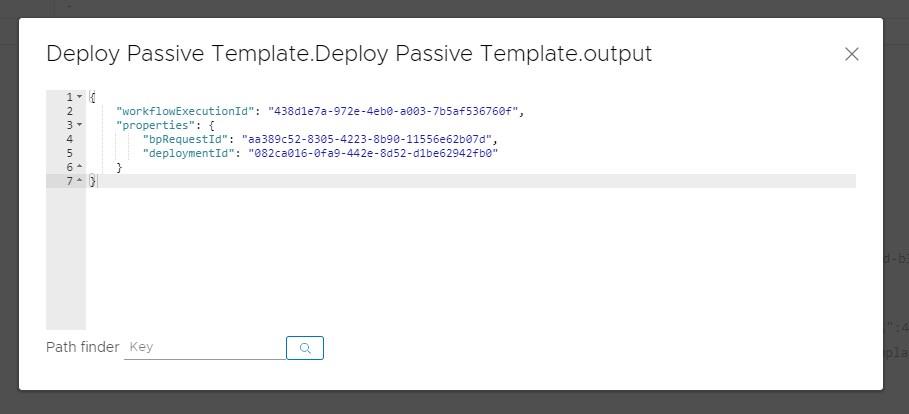
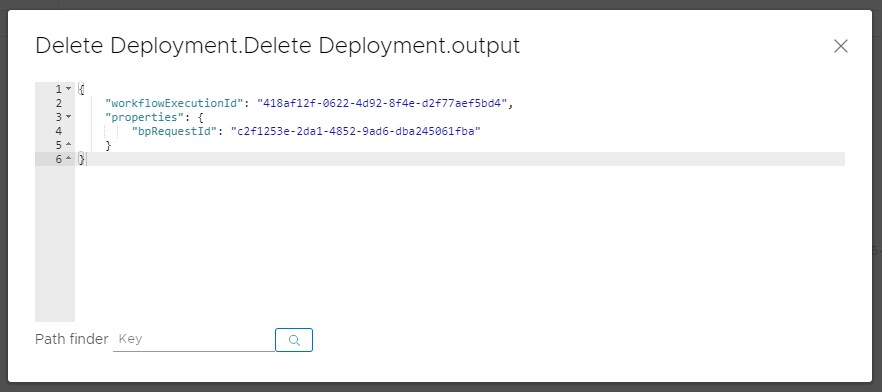
At this point we are interested in the bpRequestId output of the workflow as we need it to poll for a successful finish of the deployment:
${Deploy Passive Template.Deploy Passive Template.output.properties.bpRequestId}
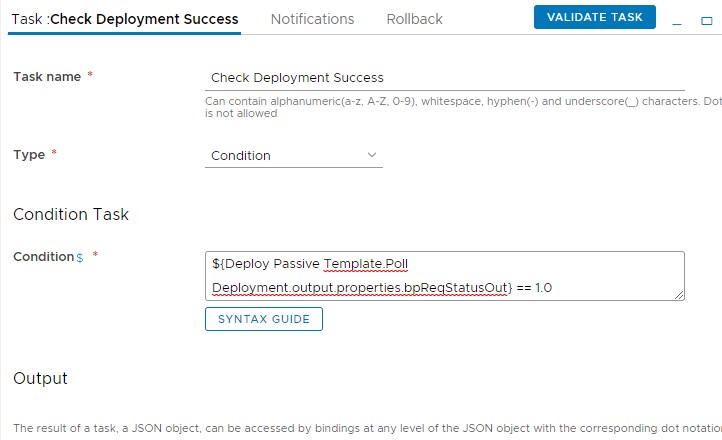
Let’s feed our polling workflow with this:

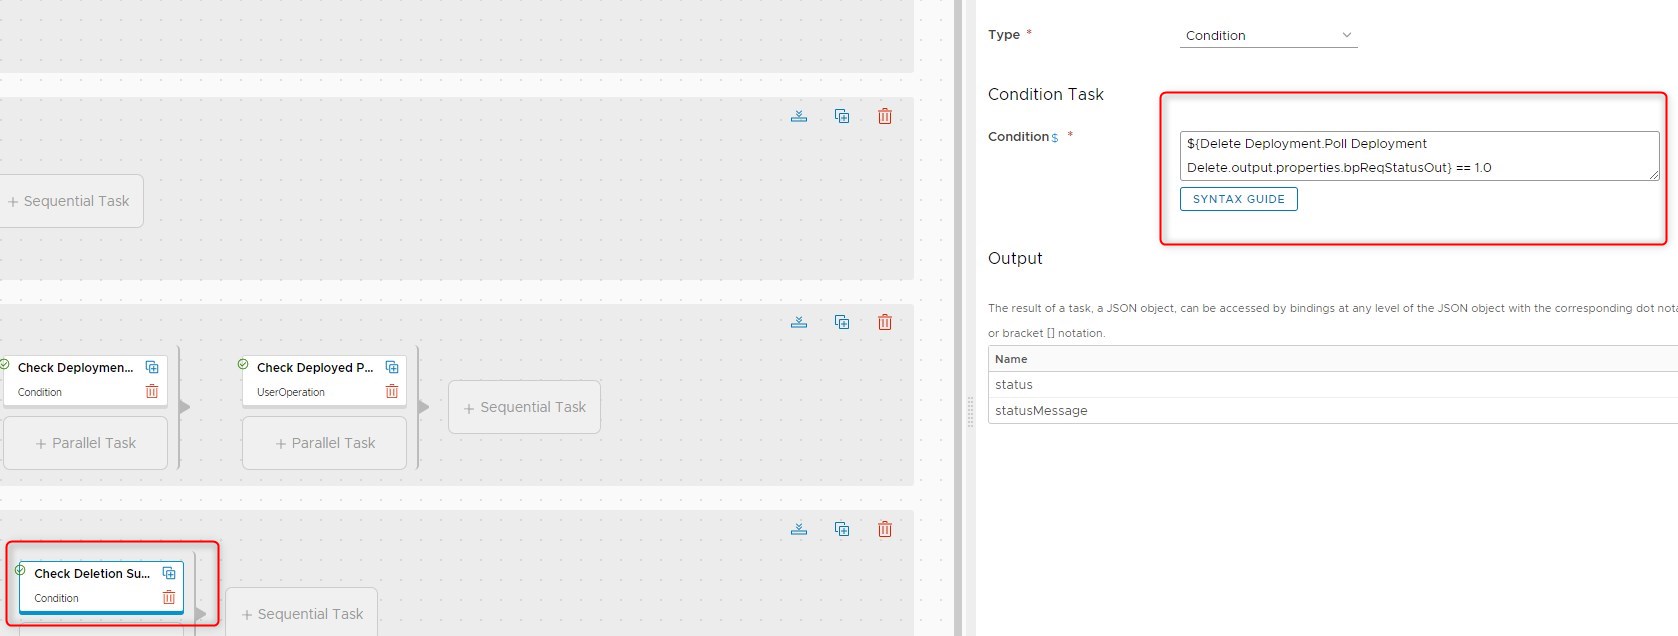
The polling workflow will provide us with either 1 (success) or 0 (failed). We want to check for 1 as a condition for our pipeline to continue. This can be done with a condition block you drag to canvas. Here you can enter a condition that has to be true for the workflow to continue. In our case it looks like this:
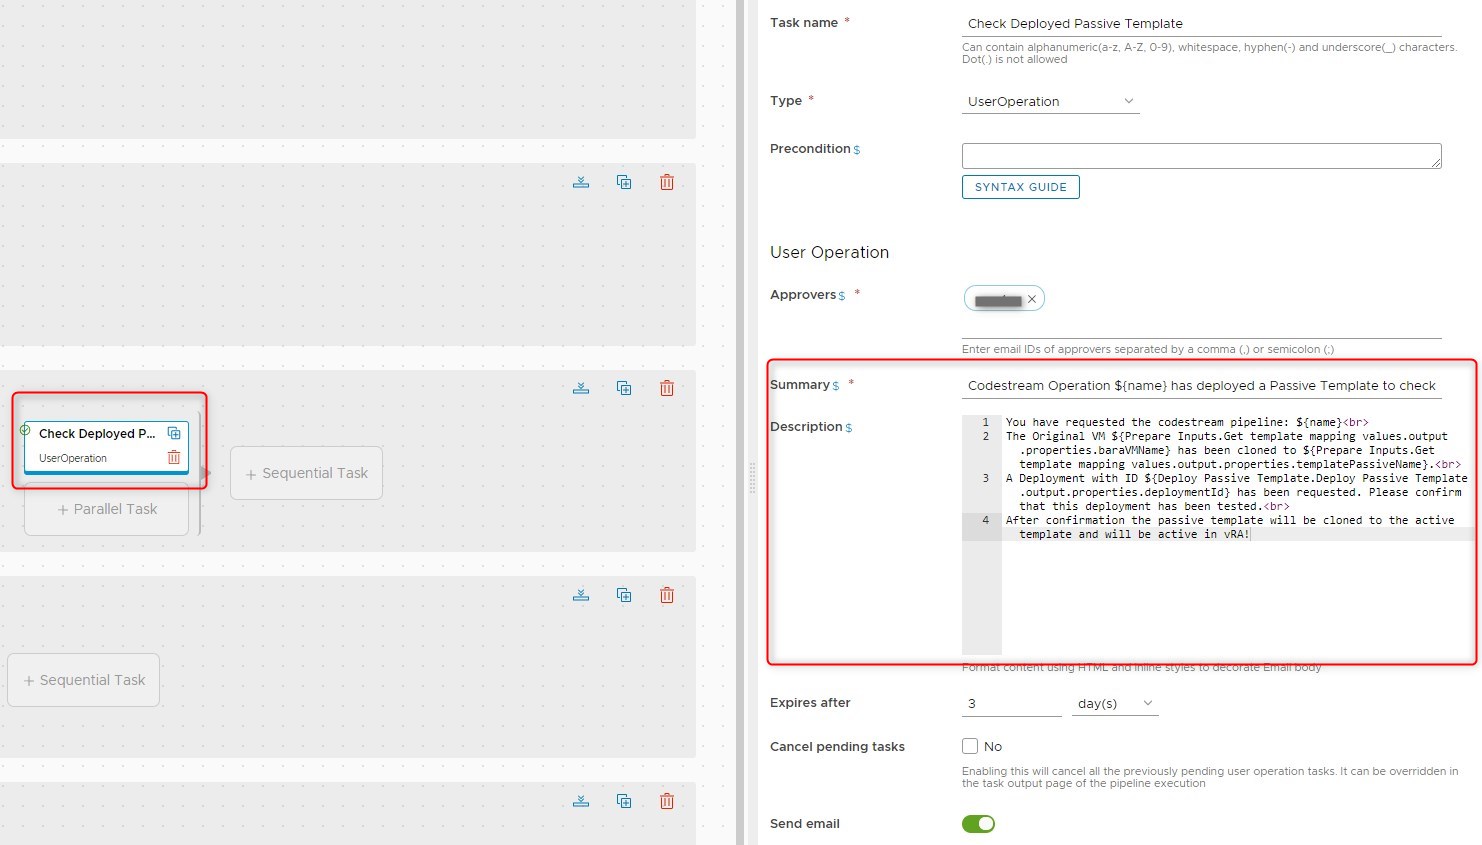
As a last task in this stage we want the user to be informed via mail that the passive template has been deployed as a VM in vRealize Automation and that he must confirm that all tests from his side have been done. All tests inside the guest OS can of course be automated and added to this pipeline if needed. Since you can talk to various endpoints with vRealize Codestream there are basicly no limits on how you set this up. If this is done by another team you just have to agree to the method being used.
This task is called a “User Operation” and could look like the example below. As you can see I made use of various values bound by ${ }.
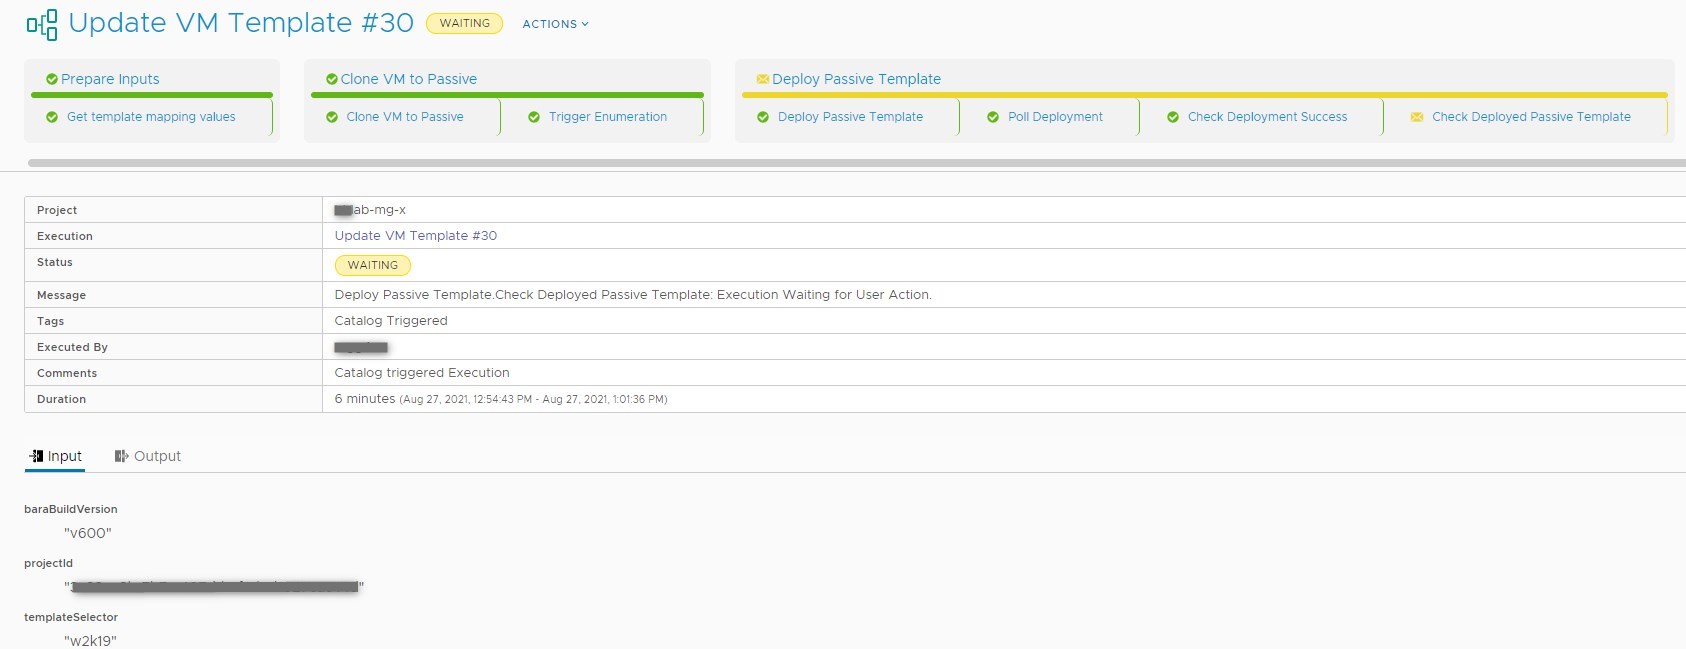
Now if you are amongst the approvers of this pipeline you will be able to see this under “User Operations” in vRealize Codestream. Also the pipeline will be in a waiting state:
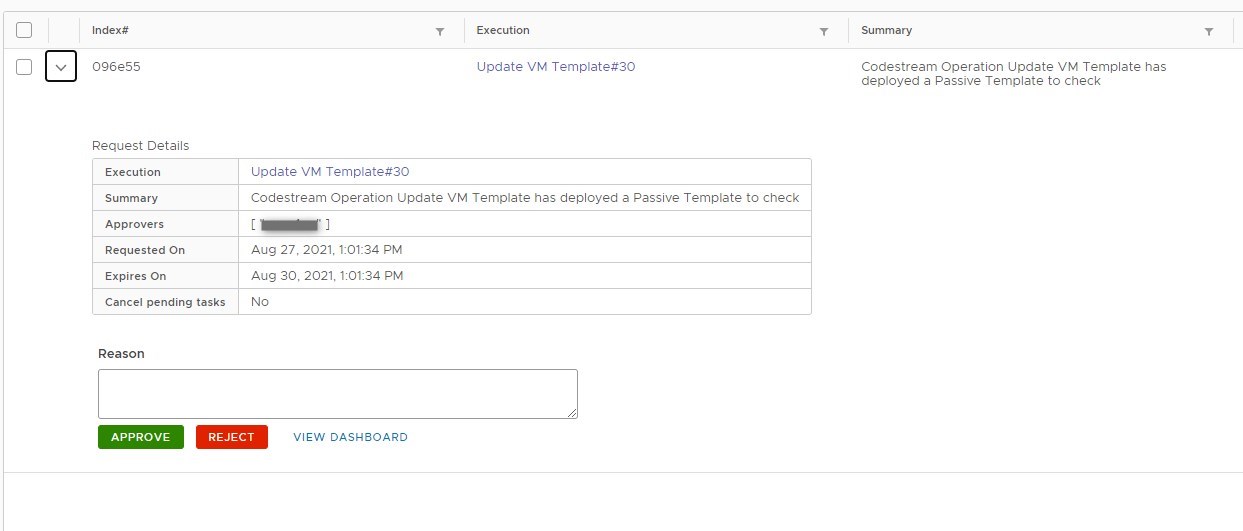
Once you provide a reason you can approve or reject. In case of an approval the pipeline will continue to run, in case of a rejection the pipeline will fail. The user will for example reject if his tests in the deployed passive template were not successful. The pipeline will then fail and he must go in and re-deploy his operating system to the base VM. When finished he can start the pipeline again until he is satisfied with the passive template deployment.
Let’s approve this and move on to the next stage.
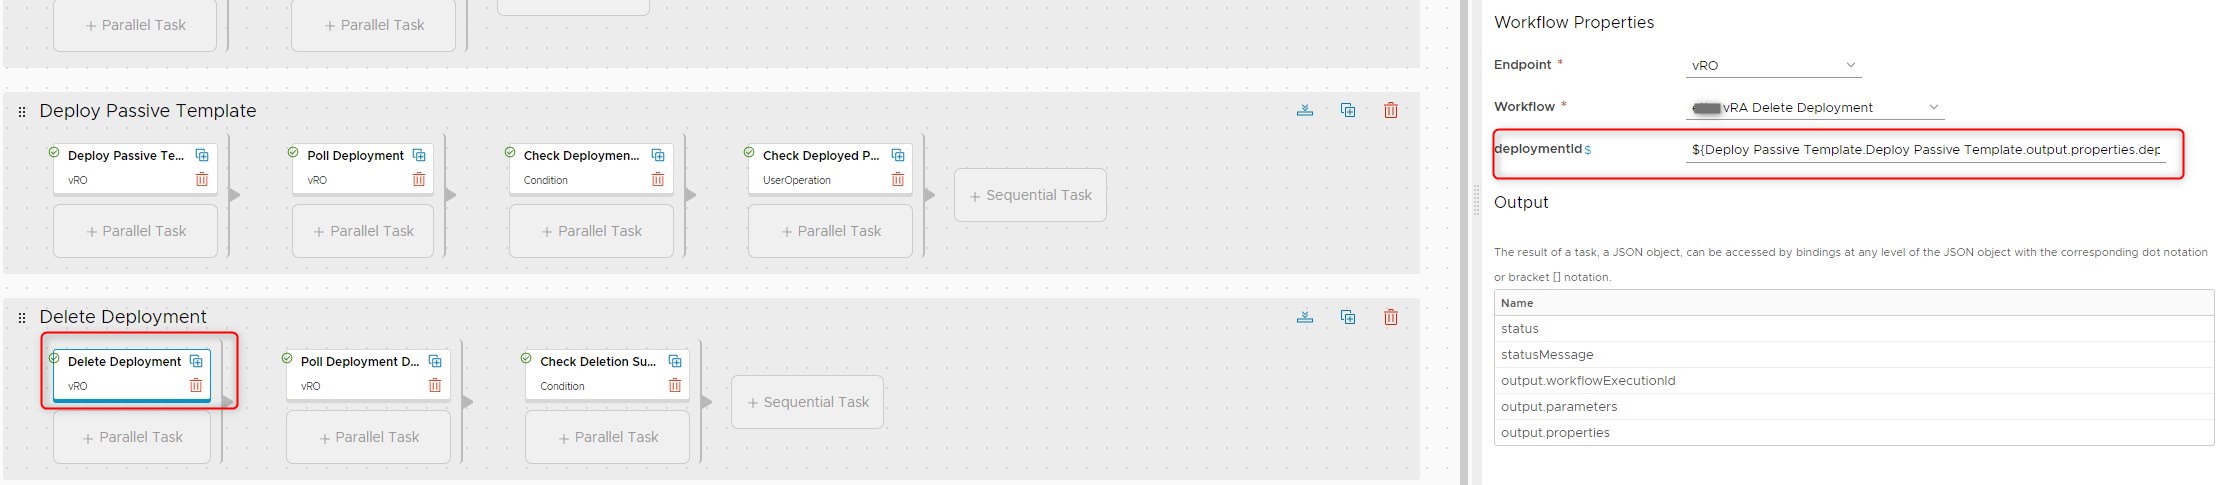
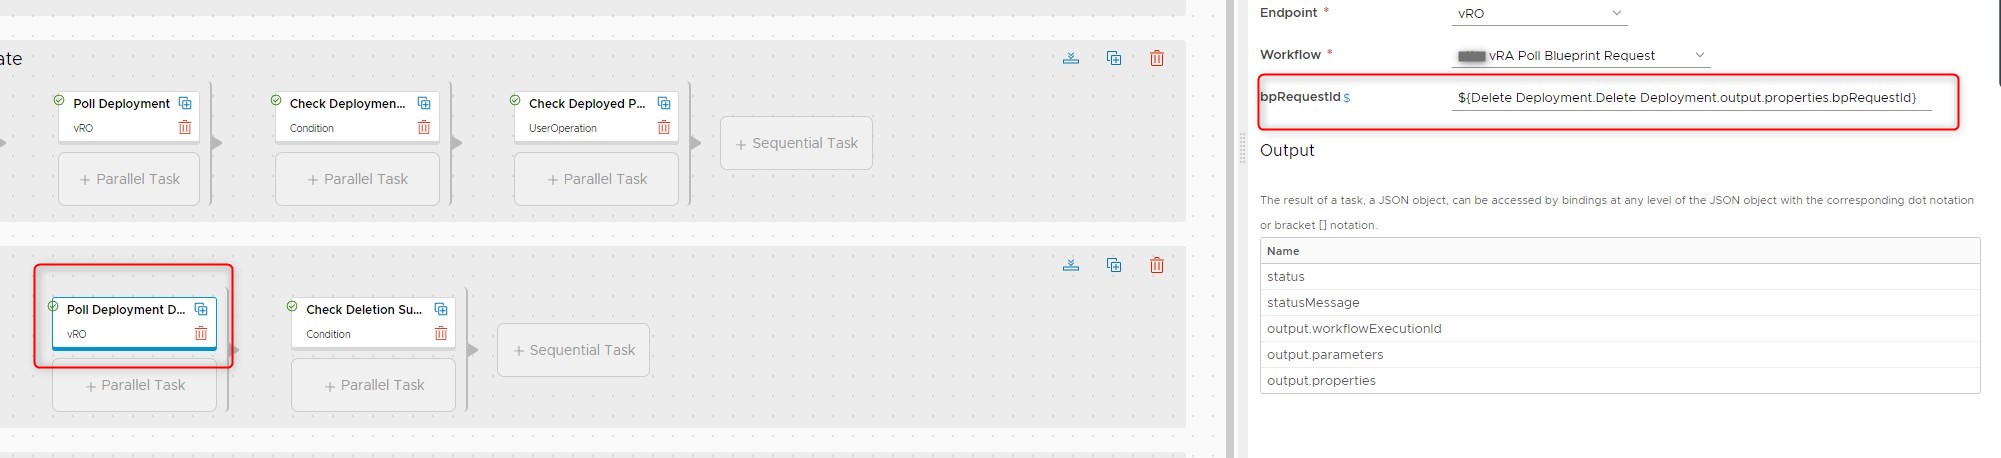
5. Stage 4: Delete deployment
We can now go ahead and delete our test deployment as this is not needed anymore. For this we set up a new stage and call our “Delete deployment” workflow. We bind the deploymentId we got from the previous stage to it as an input:
${Deploy Passive Template.Deploy Passive Template.output.properties.deploymentId}
Our delete deployment workflow will return a request ID that we are going to poll for with the “Poll blueprint request” workflow and check for poll success. Same procedure as in Stage 3 when we deployed our passive template:
6. Stage 5: Clone passive to active template
In the last stage of this vRealize Codestream pipeline we are going to clone the passive template to our active template and let vRA know about it by enumerating.
This time we are going to call our “Update VM template” workflow with the argument 2 as execution switch input so it will:
- Rename the active template to the active old template name specified in the configuration element.
- Clone the passive template to the active template
We also have to bind the templateSelector so the workflow knows the OS values to get from the configuration element.
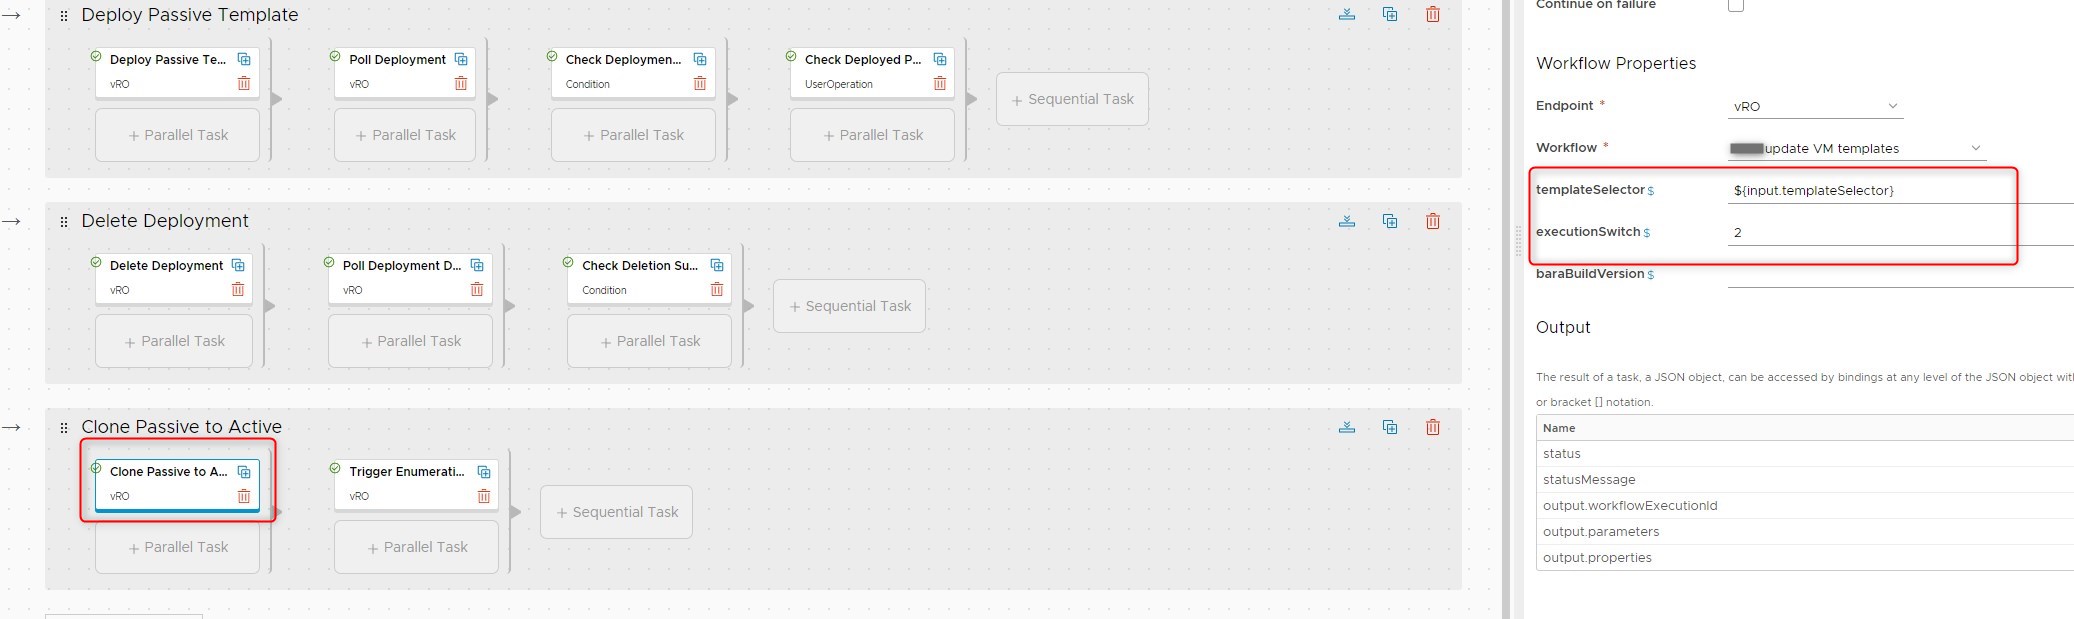
As a last element we have to trigger the enumeration workflow again so vRA knows about our new active template. This was already covered in stage 2.
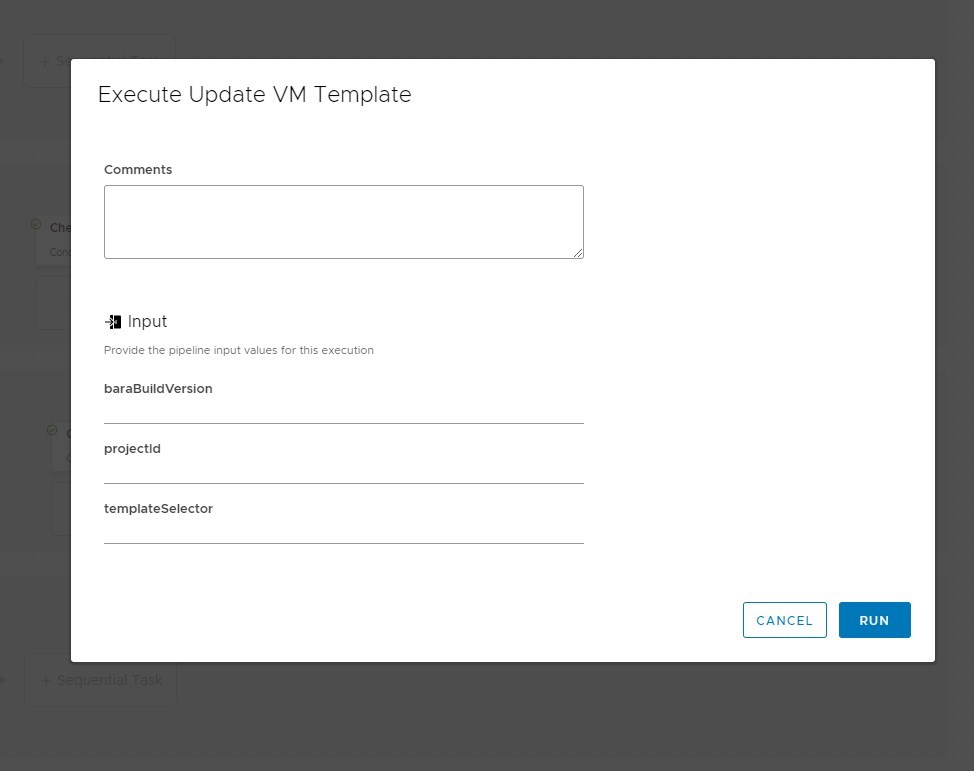
We now should have a runable pipeline ! We can trigger it via “Actions” by manually entering a correct projectId, a build version and one of the OS type keys of the configuration element:
Making the vRealize Codestream pipeline available in Service Broker
Our final goal is to make this pipeline available in vRealize Automation Service Broker. This will give our template administrators the opportunity to request it from there instead of having to go to Codestream. We will also make use of a custom form here to fetch some values for the inputs.
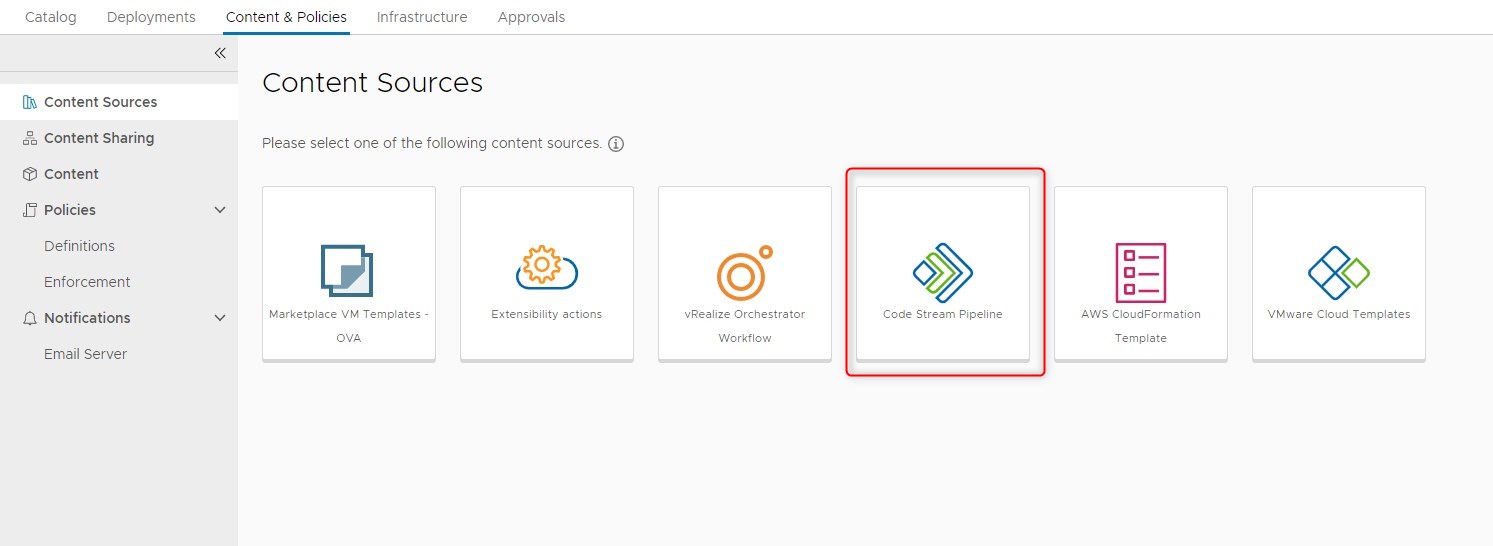
1. Defining a Codestream content source
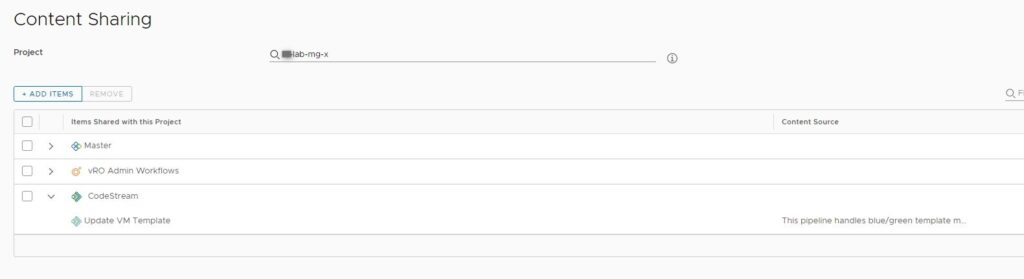
For the Codestream pipelines to show up in service broker we need to define a new content source of type “Code Stream Pipeline” and share it with the project the pipelines should be available to:
If everything is fine it should now show up in service broker as requestable item:
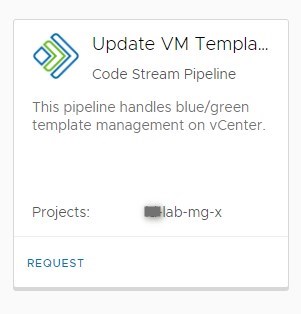
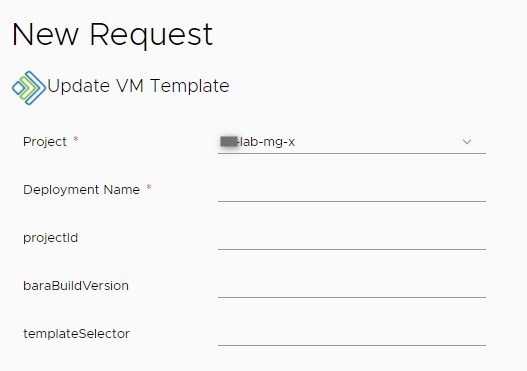
We can see that our build version and template type pipeline inputs show up here. But there are still some more tasks left to do:
- Make the template type dropdown dynamic according to the keys of the vRealize Orchestrator configuration element
- Make the projectId available to the pipeline as an input
For this we are going to define a custom form:
2. Defining a custom form
From content / customize form we are going to enter the custom form editor:
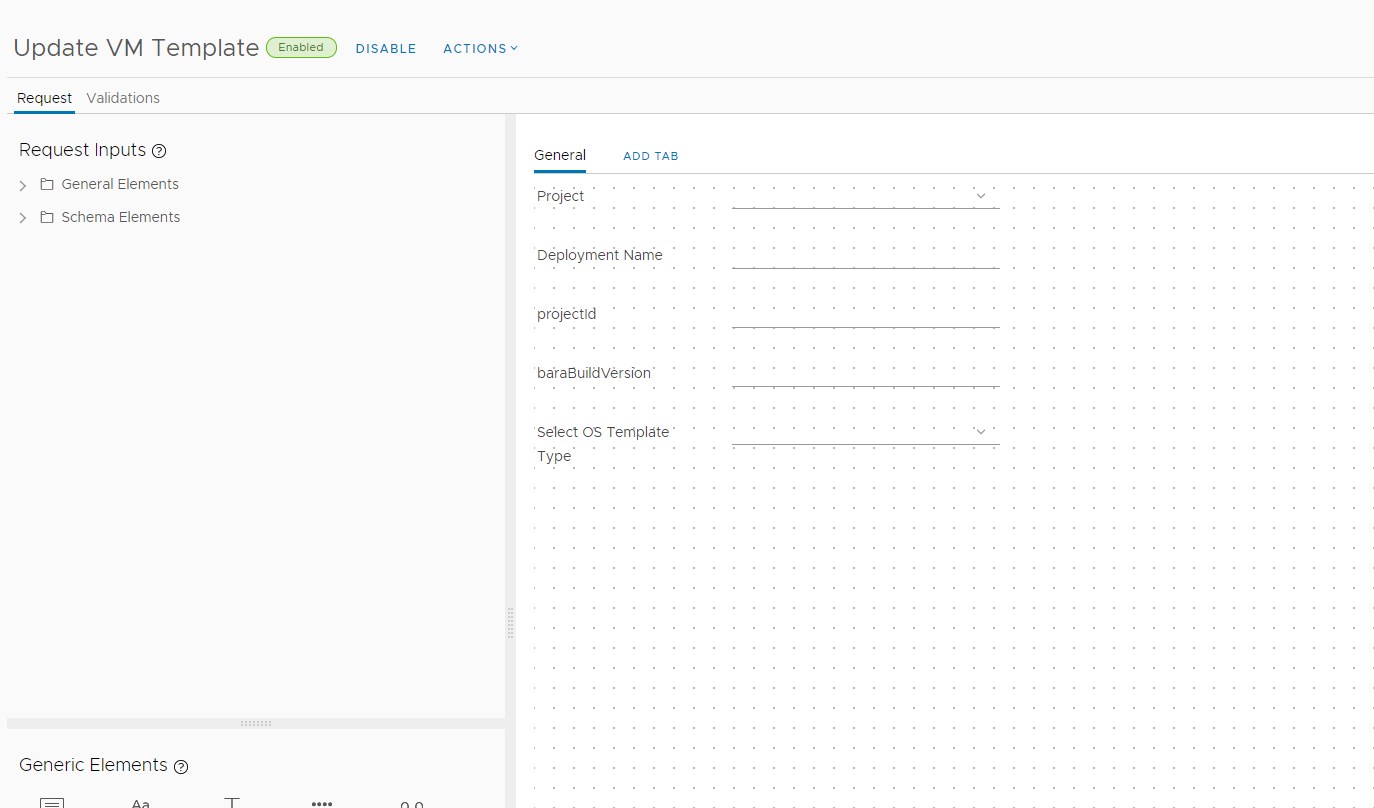
We will be presented with all the input values from our pipeline. First we are going to take care of the projectId that should be available for the pipeline. As this can’t be grabbed directly from the “Project” dropdown by the pipeline we are going to bind the value from this field to our projectId field and make it invisble:
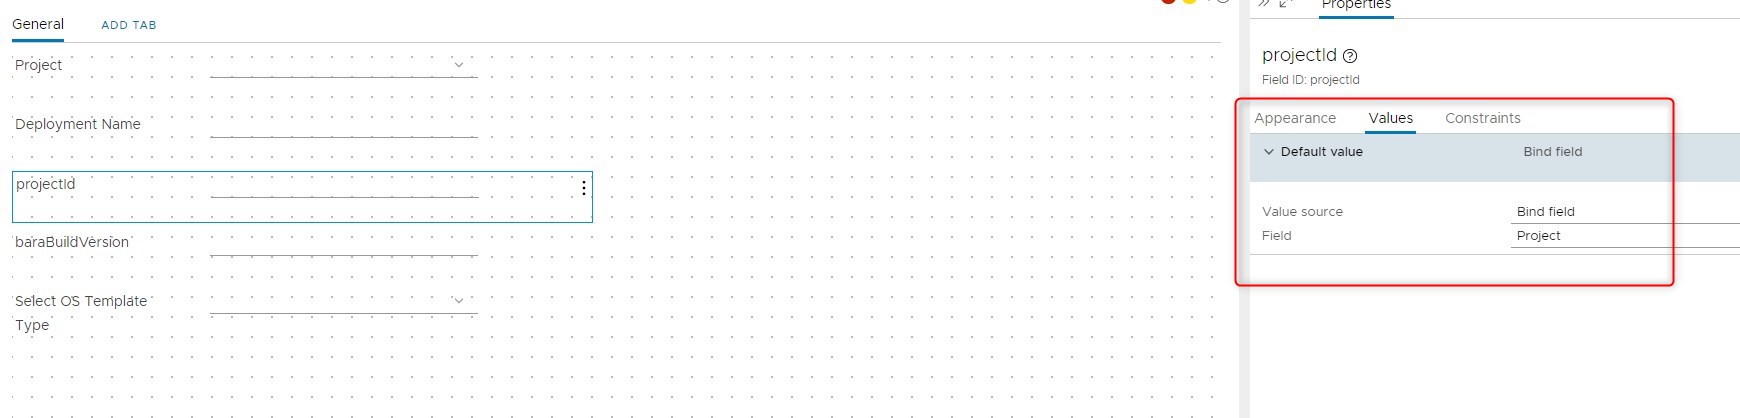
This will make the field not show up in the request form but it will still get populated with the same value selected in “Project”. Like this we have the projectId available in the pipeline input.
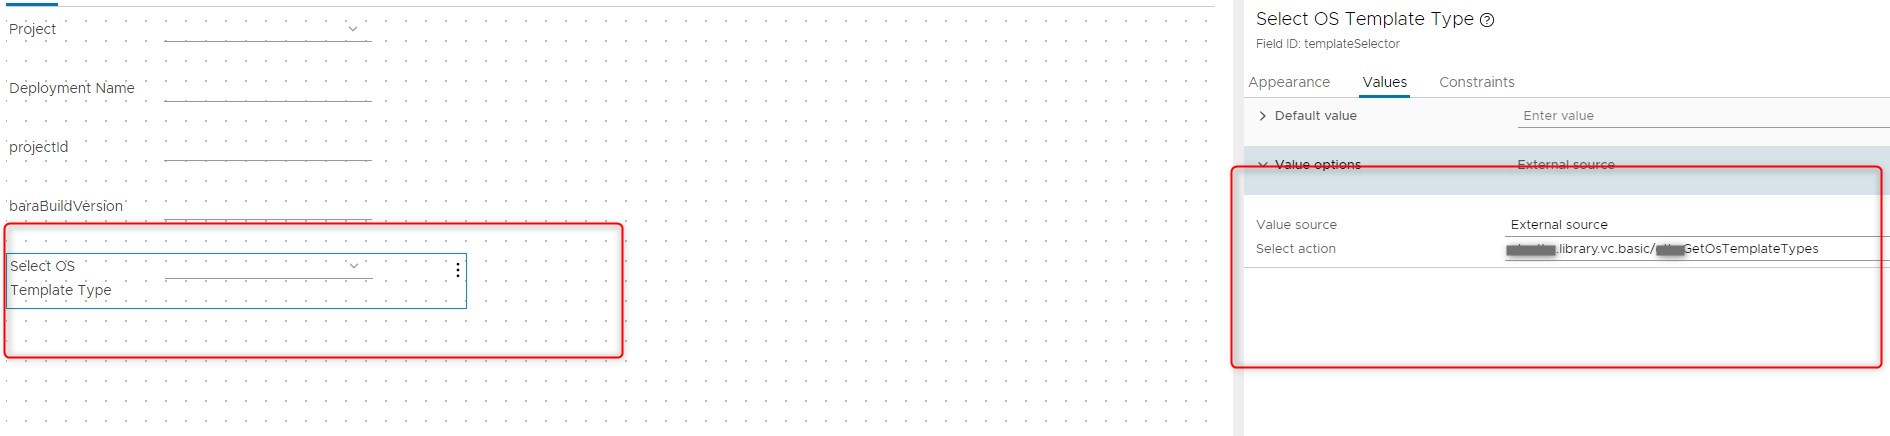
Next we are going to tackle the OS template type selector. This will be fed to the templateSelektor input of our pipeline. The values of the dropdown basicly represent the keys of our configuration element, so instead of making this static, we are going to fetch them with a vRO action:
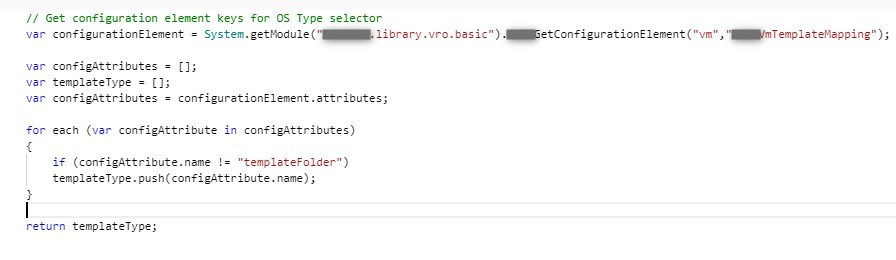
As I look at this, I admit this action is very specific to this use case and should be more generic. To do list…
Also a point to approve would probably be to move the template folder value inside configuration element properties value, so I don’t have to filter for it here.
We will now select the vRealize Orchestrator action in the custom form to populate the dropdown with these values:
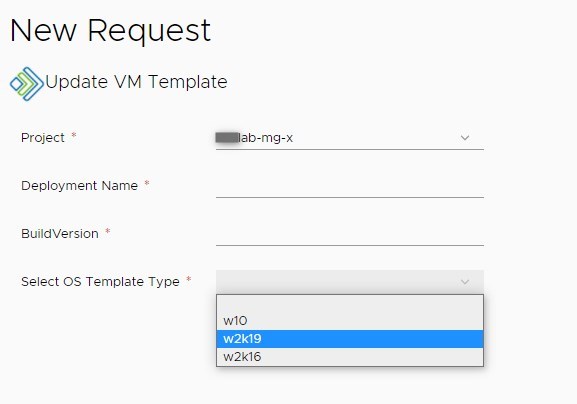
When enabling the custom form and requesting our pipeline item it should now look like this:
Requesting the vRealize Codestream pipeline in vRealize Automation Service Broker
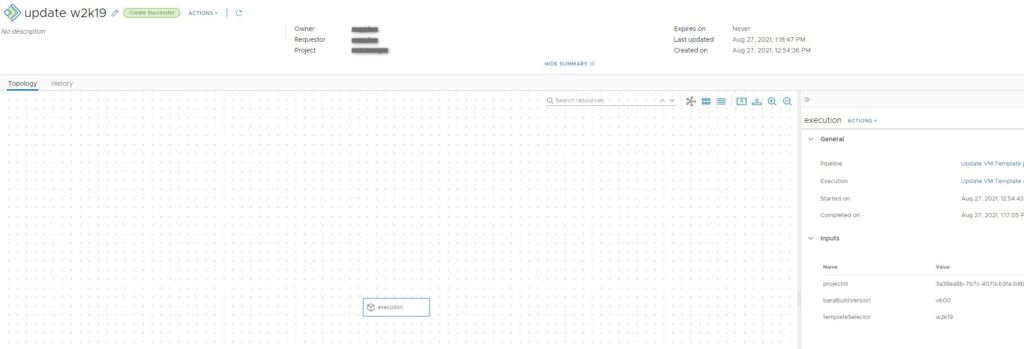
Finally it’s time to relax and watch our pipeline being requested from the Service Broker form. After starting the request there should be a deployment showing up (Yes, the pipeline run is also treated as deployment). If you click it, you can see an execution object and the input values selected during the request. A pipeline can also have output values which would be visible here.
But even more important, there will be a deployment showing up after a few minutes that represents our passive template request:

Looking at vRealize Codestream you should be at the user operation step after a few minutes and a mail should be in your inbox telling you to confirm this step:

After confirming this, the pipeline should continue to its end. You have now successfully exchanged your new template build and it will be active in vRealize Automation from now on !
Conclusion
In this post I showed one example of how vRealize Codestream could be useful in your environment. One question that might pop up is: Why are you using Codestream for this ? Of course this could be done using vRealize Orchestrator alone, but there are a few reasons why I incorporated Codestream:
- I wanted to able to request this with a user interaction in between. Manually confirming was a requirement in this case and Codestream can handle this quite easy.
- Codestream pipelines can also be triggered by Git commits. As the team that handles OS builds also uses git I could listen to their commits in the future and trigger the pipeline from there.
I hope you enjoyed this post. Feel free to share this with the social icons below if you think this could be interesting for your contacts.